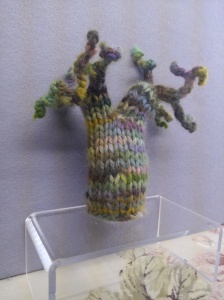
Botanica Mathematica

a textile taxonomy of mathematical plant forms


6 Comments

Fibonacci Tree

Last week I got chatting to Étienne Ghys, a wonderful French mathematician who was in Edinburgh showing us his new films about Chaos. We told him about Botanica Mathematica and he said “You could knit a Fibonacci tree!”.

And I thought, “Why haven’t we already knitted a Fibonacci tree??” The idea was so obvious and its execution so easy that it seemed silly not to have done so already. The Fibonacci pattern is also an excellent model for how plants actually grow, so it was perfect for the Botanica Mathematica project.

How does the Fibonacci model work? Well, you start with a branch, and after a certain period of time it splits into two smaller branches: a main one and a sapling. In the next time period the sapling stays the same size as it grows to adulthood, while the main branch once again splits into two. (We had a discussion of this in a previous post.) Here’s a picture of the resulting tree:

Fibonacci treeThe black numbers to the right indicate how many branches there are at each time step. This sequence of numbers is known as the Fibonacci sequence, and the next number is the sum of the previous two.

The small blue numbers next to each branch indicate how wide the branch is – in knitting terms this is the number of stitches you are knitting with (in the round) for that branch.

So, start at the bottom of the tree by casting on 21 stitches. Join in the round and knit for 21 rows (the blue numbers also indicate the height of each branch!). Then put 8 of the stitches onto a stitch holder while you knit with the other 13 (joined in the round). After 13 rows, put 5 stitches onto a stitch holder while you knit (in the round) with the other 8, continuing in this way until you reach the top of the tree. Then go back to the last set of stitches being held, pick up the stitches and knit in the same way as before to the top of the tree. (It’s exactly the same technique as for the binary bonsai.)

There’s Fibonacci numbers everywhere in this tree: in the number of rows you do at each stage; in the size of each branch; and in the number of branches at each horizontal cross-section. The ratio of successive Fibonacci numbers gives (an approximation to) the golden ratio, and indeed the finished tree has a pleasing dimension and appearance to it. I think it looks more realistic than the binary bonsais.

Here’s a picture of my finished tree:
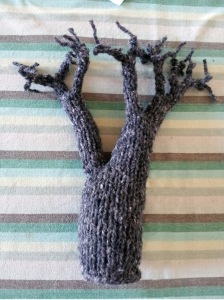
Knitted Fibonacci TreeDo you like it? Do you have more ideas of what we could make, or ideas of how to adapt the Fibonacci tree? Let us know!


1 Comment

knitted chanterelles

knitted chanterelles by MadeleineS
knitted chanterelles, a photo by MadeleineS on Flickr.

Whoops! this picture was originally posted without any text – sorry.  I was testing a new uploading app for Flikr and hadn’t realised it had appeared on the blog too.

Anyway these cute little knits are a couple of hyperbolic chanterelle mushrooms that I knitted up using different increase methods.  The knit front and back method is definitely more realistic but the holes from the yarn over technique create interesting patterns of their own.

So how do you make one?  These are knitted in slightly heavy double-knitting weight yarn on 4.5mm circular needles but you can make them bigger or smaller by choosing different yarn and needles.  Cast on 6 stitches and work a short i-cord stalk (6 rows or so). Now increase every fourth stitch till you get 8 stitches.  After that it’s a bit too big to work as i-cord so work flat stocking stitch instead but slow down the increase rate.  On the plain rows increase every fourth stitch.  On the purl rows don’t increase at all.  After about 20 rows cast off and you should have something that looks like one of the mushrooms in the photo.

Have a go! Have fun with it and let us know how you get on.


4 Comments

Chaotic knitting

In mathematics, a chaotic system is one which has clear rules on what to do from one time step to the next, but where the outcome is unpredictable because it is so sensitive to the starting conditions.  Amazingly, we can make up a very simple knitting pattern which is complete chaos…

Let me give you the general idea before I get into specifics. There are two colours. You start with a row consisting of the colours chosen in a random order. Then in subsequent rows, the colour of a stitch depends on the colours of the three stitches below it. (That is, the one directly below and the ones either side of that stitch.) If you’re at an edge stitch, you need to look at the stitches at the other end of the row – imagine they wrap around in a circle.

The specific rule I chose is the following. Let W=white yarn, O=orange yarn.

Stitch pattern below New stitch colour
OOO W
OOW W
OWO W
OWW O
WOO O
WOW O
WWO O
WWW W

This is called ‘Rule 30’ and you can read more about it on Wikipedia.Not all rules are chaotic, but this one is. If you change the colour of even just one stitch in the starting row, you’ll get a completely different pattern.

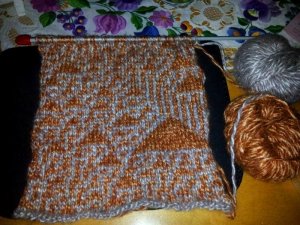
Here’s the pattern I made:

cellular automata knitting - rule 30The first thing you’ll notice is all the triangles that appear. That was unexpected. There are also some straight lines on the right. But it’s all very random.

This way of creating patterns is known mathematically as a “one dimensional binary cellular automaton”. It is one-dimensional because it only relies on the stitches immediately below it, and not all the other ones around it. Wikipedia has a lot of information about more general cellular automata if you are interested!

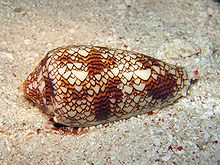
One of the amazing things about Rule 30 is that it appears in nature too. There is a particular species of sea snail, called Conus textile, which shows up a very similar pattern on its shell.

Conus textile shellNotice the triangles appearing as well as regions of straight lines. Amazing!

Try experimenting with different rules, different colours or even different numbers of colours and show us what you find! (I recommend coding up the pattern in Excel if you can – it makes it much easier to knit. If you’d like a copy of my spreadsheet, send me an email at Julia.Collins@ed.ac.uk.)


4 Comments

Introduction to L-systems

The Botanica Mathematica project is about using simple mathematical rules to generate pieces of knitting or crochet. If the rule involves choosing what to do based on what you have already done, then you will be making an L-system. Madeleine has already written a post with a simple example, and in this post I want to elaborate on it some more.

Continue reading


9 Comments

Binary Bonsai

Simple Binary Tree

simple binary tree in Misty Alpaca chunky yarn on 6.5mm dpns.

These little trees are knitted in the round and repeatedly divided in two to form branches and twigs. They could also be crocheted but I haven’t tried it yet so I’ll talk in terms of knitting. Once I get time to try it I’ll write it up. In the meantime have a go yourself once you get the idea of the knitting.

The choice of yarn and needles is up to you. Browns and greens are best for colour. Thickness of wool and size of needles can vary but it’s best to work to a slightly tighter tension so the stuffing doesn’t show through. I’ve used a set of five double pointed needles in my test pieces but you could use circular needles and the magic loop technique. Spare dpns are handy as stitch holders towards the end and when you’re making i-cord branches.

In order to be successful with all these divisions you need to start with a power of two stitches. Not just a multiple of two – every time you divide your stitches in two each part must also be divisible by two. So you need numbers like 4 (2×2) or 8 (2x2x2) or 16 (2x2x2x2) or 32 (2x2x2x2x2) and so on. The first couple of these will give you a very small structures without much branching so I’d recommend starting with 16, 32 or 64 stitches, depending on the yarn and needles chosen.

Once you’ve decided how many to start with cast them on, join in a circle, place a marker at the start of the round and knit the trunk of your tree. Trees come in many shapes and sizes so you can make it short and squat or longer and thin. For your first tree I’d knit as many rounds as you have stitches cast on.

Now place half the stitches on a holder and knit rounds with the rest. Your first branch is under way. As many rounds as you have stitches and then split again. Keep doing this until you run out of stitches. Cast off and break the yarn.

Rejoin the yarn at the smallest split pick up the stitches and work to the end. Then go back and to the next smallest split and work to the end splitting as you go. Eventually you’ll work back to the first split in the trunk and so you pick up the stitches and work the same branching structure at this side of the trunk. Once you’ve run out of stitches to pick up and all the branches have tapered off then stuff the tree with toy stuffing. Gently push the stuffing into the branches and the floppy tree skin you knitted should start to support itself.

When you are a happy that the tree is well stuffed stitch a piece of felt across the bottom of the trunk or pick up stitches round the hem and knit a base – if you want you could even knit a few big roots to make it more realistic.

If you’d like to contribute your tree to the Botanica Mathematica specimen collection please send it, with a note of your name and location (and anything else about it you think we’d find interesting), to:

Madeleine Shepherd
Coburg House Art Studios
15 Coburg Street
Edinburgh
EH6 6ET
United Kingdom

Simple Binary Bonsai Pattern

  1. Cast on 16 stitches, join in a circle, place marker.
  2. Knit 16 rounds.
  3. Place 8 stitches on holder.
  4. Knit 8 rounds on remaining 8 stitches.
  5. Place 4 stitches on another holder.
  6. Knit 4 rounds on remaining 4 stitches.
  7. Place 2 stitches on another holder.
  8. Knit 2 rounds on remaining 2 stitches.
  9. Cast off and cut yarn.
  10. Pick up 2 stitches from line 7, rejoin yarn and work lines 8 and 9.
  11. Pick up 4 stitches from line 5, rejoin yarn and work lines 6 to 10.
  12. Pick up 8 stitches from line 3, rejoin yarn and work lines 4 to 11.
  13. Tuck all the ends of yarn inside the tree. if there are any odd gaps stitch them closed with some spare yarn.
  14. Stuff tree with toy stuffing.
  15. Close the base of the trunk with knitting or by stitching a circle of felt in place.